I got one request for it (Thanks, Holly!), and one is enough for me, so here we go!
The first part is making a felt ball using roving. Using roving makes felting go much, much faster. But if you'd don't have roving, that's ok. Just skip on down to Part 2 where I show how to do it using wool yarn.
Part 1 - Felted Ball Using Roving
1. Start with your cat/ferret jingle ball found at pet stores.
2. Hold the ball in one hand and start wrapping the roving around it.
3. Keep wrapping while trying to keep the wool even all around.
4. Keep wrapping...
5. Wrap enough roving around until you get the size of ball you want. Keep in mind that it will shrink some while felting, so you might want to make it a little bigger than what you want the finished product to be.
6. Get an old nylon stocking. It's easier if you cut it so it's only about 12" long. Gather the nylon in your two hands until you get to the toe.
7. Then shove the ball in, pushing it as far into the toe as you can.
Make sure the end of the wool is facing the toe or it could come unraveled a little.
We don't want that!
8. Get out your dish soap.
I promise this is not an ad placement!
9. Drizzle the dish soap on.
10. At this point you might want to get out some rubber gloves. I didn't which is why my fingers are red.
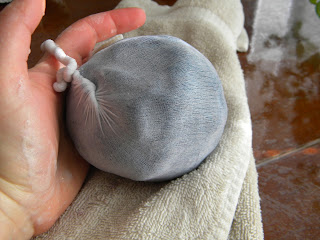
Twist up the end of the nylon like shown above, so that it helps maintain a round shape and hold the ball under hot water. You may also need to pull and tighten the nylon around the ball throughout this process. Scrub with one hand while rotating the ball in the other hand. Continue to get it wet, scrub it, get it wet again, and scrub it, etc. After awhile you'll need to add more soap. You'll notice the ball will get lumpy and uneven. It's okay! The wool is shrinking. Keep up the scrubbing and soaping and wetting under hot water for about 5 minutes. Then rinse and squeeze repeatedly to get as much of the soap out as you can.
11. Remove from stocking and you're almost done! Run the ball under water, perfecting the shape as much as you can. Squeeze out water as best you can. Set on an old rag or cloth to dry. If its dyed wool, there may be some staining to the rag. Let dry over night in a warm place.
Part 2 - Felted Ball Using Wool Yarn
Make sure you use 100% wool yarn that specifies that it is good for felting like the "Fisherman's Wool" line of yarn which is what I used in my project below.
1. Hold your yarn in place and start wrapping.
It may be a little difficult as the surface is slippery plastic.
2. Keep wrapping...
3. Try to keep the yarn evenly distributed as your wrap until it's the size you want.
I wanted a little one.
4. Finished ball.
5. Now get that nylon stocking (12" long), stuff it into the nylon (making sure the end doesn't come unraveled), and duplicate steps 8-11 above except increase the scrubbing/soap process to 10 minutes.
There will be some shrinkage, but not as much as the roving ball.
The yarn ball will hold its shape much better than the roving one too.
Beautiful!
Aaah! A completed set. I'm so excited!
Can you tell I love these things?
*Note: If you'd like a crinkle ball, replace the center jingle ball with a big wad of cut out bill envelope windows. What a great way to recycle!
*Another note: You don't have to put anything in the center at all. If you want just a plain ol' wool ball, just wrap the yarn or roving around itself in a tight ball and wrap to the size you want, etc.
*Another note: You don't have to put anything in the center at all. If you want just a plain ol' wool ball, just wrap the yarn or roving around itself in a tight ball and wrap to the size you want, etc.
Good luck and have fun! Let me know if you try this out and send pictures!


2 comments:
Awesome Sarah! Thanks so much for the tutorial. The little felting I had done was with a felting needle--so now I know how to do it with water. So very helpful. Hope baby M has a good birthday and enjoys her present!
How very sweet! What a lucky little girl to have such a creative mommy. :-)
Post a Comment